How to Do the Middle Splits
- Chloe Jay
- Feb 6, 2024
- 6 min read
Updated: Jul 4, 2025
If you had told me years ago that one day, I’d achieve my middle splits, I’d never have believed you.
Like front splits, I didn't think my anatomy would let me. It wasn’t a possibility. But fast forward to 2023 during a regular yoga class I attended, and ‘plop’, I sank into middle splits with ease.

This wasn’t the result of my natural flexibility or a freak accident. My middle splits were achieved thanks to the repetition of a certain group of asanas I had practised for extended periods. This article explores these asanas and how to get your middle splits.
Anatomy of the Middle Splits
Known as Samakonasana in Sanskrit, the middle splits (or centre splits or box splits) can be considered an advanced asana. This is because it relies not only on the flexibility, but the strength of several muscle groups that wouldn’t necessarily extend (lengthen) during day-to-day activities.
To achieve middle splits, we rely on the following muscle groups:
Hip flexors - the three muscles that help us flex our hips, i.e. take a step forward or kick the leg above the waist
External hip rotators - muscles that live in your pelvis, butt and legs that help the thigh and the knee rotate outward, away from the body - these are important for bringing the pubic bones to the floor
The glutes - your butt
Adductors - your inner thigh muscles that are being stretched
Hamstrings - a group of muscles found at the back of each thigh
Check out the asanas and exercises below to target all of these areas.
1. Skandasana
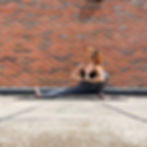
How to do Skandasana
Begin standing with your legs wide and your toes turned out slightly
Starting with the right side, come into a side lunge, bring both hands to the floor if that feels more comfortable for you
Your left leg begins to straighten as you sink into your right side
Root through your left heel so that your left toes face upwards
Remember to keep the spine elongated - if the body allows for it, bring hands to the heart centre (Anjali Mudra)
Other hand placements include: hands on the floor, arms wide or a bind
Repeat on the other side
2. Frog Pose
In Sanskrit: Mandukasana

How to do Frog Pose
Begin in a tabletop position: on all fours with the wrists stacked underneath the shoulders and the knees underneath the hips
Slowly begin to shuffle the knees outwards, making sure they stay in line with the hips
When you’ve reached a comfortable position, make sure each leg is at a 90-degree angle, with the soles of the feet in a straight line and toes pointing out to the sides
Gently bring the forearms down, ensuring that the elbows remain underneath the shoulders
Imagine the pubic bones are sinking downwards, always bringing it back if you experience any pain or pinching
3. Bound Angle Pose A
In Sanskrit: Baddha Konasana A
How to do Bound Angle A
Begin in a crossed-legged position
Bring the soles of your feet together so that your knees fall wide
Wrap your hands around the tops of your feet, bringing your heels towards your pelvis
Make sure both glutes are glued to the mat and with a straight back, look up
Hinge from your hips and slowly fold forward, bringing your chest towards the mat
Keep your hands wrapped around your feet, or you can plant your palms in front of you and slowly begin to walk your fingers forward, dropping the forearms if that’s comfortable for you
4. Bound Angle Pose B
In Sanskrit: Baddha Konasana B

How to do Bound Angle B
Begin in Baddha Konasana A
Shuffle the feet forwards slightly so that you’re left with a diamond shape with your legs
Take your feet in your hands, but this time, open up the soles so that they’re facing upwards
From here, dig your elbows into the creases of your knees
Stay here or, to deepen this, bring the crown of your head down towards your feet
5. Malasana Squat
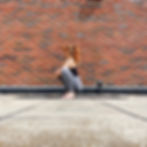
How to do Malasana
Begin in a standing position
Shuffle your feet a little wider than hip-width, with your toes pointing outwards and heels pointing inwards
Sink into a low squat, bending your knees and keeping your pelvis low
Dig your elbows into the creases of your knees and join your hands together to meet at heart centre (Anjali Mudra), alternatively, place your hands on the floor for support
Straighten the spine
6. Fire Log Pose
In Sanskrit: Agnistambhasana

How to do Fire Log Pose
Begin in a crossed-legged position
Bring the bottom shin so that it’s parallel with the top of the mat, in one straight line
Then, stack the top shin on the bottom shin, making sure it’s also parallel to the top of the mat
The top foot should rest on the bottom knee, and the top knee should rest on top of the bottom foot
Flex both feet
Repeat on the other side
7. Cow Face Pose
In Sanskrit: Gomukhasana

How to do Cow Face Pose
Begin sitting on the floor with your legs extended in front of you in staff pose (Dandasana)
Bending your left knee, shuffle your right foot to the outside of your left hip, weaving it under your left knee
Shuffle your left foot to the outside of your right hip
Your knees should be stacked on top of each other
Grab your feet
Alternatively, you can bring your arms into a T shape and:
Internally rotate your left shoulder so that your left palm now faces behind you, bending the elbow, send the back of your hand between your shoulder blades
Send your right arm up so that fingers point to the ceiling, bending your elbow, place the palm of your hand on your upper back - begin to walk your fingers down towards your left hand
Keep the hands as they are or, interlock fingers together if it’s comfortable
Repeat on the other side
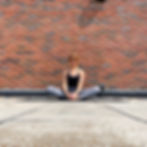
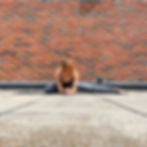
8. Seated straddle
In Sanskrit: Upavistha Konasana

How to do Seated Straddle
Begin sitting with your legs as wide as feels comfortable
Actively flex feet, making sure that your toes are pointing up towards the ceiling
Your inner thighs should be facing forward
Ensure that your spine stays long and your feet flexed as you begin to walk your hands out in front of you
If your body allows for it, bring your forearms down, always looking forward rather than down and making sure your spine is in line with your neck
9. Half Middle Splits
How to do Half Middle Splits
Begin in a tabletop position: on all fours with your wrists stacked underneath your shoulders and your knees underneath your hips
Send your right leg wide, making sure it’s in line with your right hip
Anchor through the little toe edge of your right foot, making sure the sole is fully grounded
Then, think about lowering your pubic bones a little towards the mat - as you do so, the right foot will slide further to the right
Repeat on the other side
How to Safely Enter the Middle Splits
Before attempting middle splits, ask yourself the following questions:
Am I warm? Have I worked the hamstrings and hip flexors using the asanas above?
Have I tried the above positions and feel comfortable in them? If the answer is no, spend some more time in each before attempting middle splits.
Will I listen to my body? This means ignoring the ego when it tells you to progress further into the stretch, regardless of any discomfort or pain you might be feeling. Always bring it back if something doesn’t feel right - this is where common injuries occur.
To Enter the Middle Splits:

Begin standing with legs wide, hands on your hips
Start to shuffle both feet wider than your current stance, taking lots of care as you do so
As your pubic bones draw nearer to the floor, you may wish to bring your palms to the mat or yoga bricks if you’re using them
Gently bring your pubic bones and inner thighs to the mat - if you’re not quite there, keep your hands on the floor or use a yoga brick for extra support
Make sure your toes are facing forwards rather than up - the inner ball of your ankles touching the mat
Final Thoughts
There’s no time like the present!
This pose can take a long time to achieve, so I recommend starting your journey to the middle splits as soon as you can.
The postures and stretches that I’ve included in this article are tried and tested and require consistent, persistent practice.
So, hang out in each for a few minutes, a few times a week, and you’ll be pleasantly surprised at how quickly you begin seeing progress.
As always, listen to your body. If you ever feel pain, pinching or discomfort, it’s an indicator that your body isn’t ready for a certain level of flexibility. It’s good to challenge ourselves, but finding balance is key. If the ego is telling you to surpass the pain, politely shush it, bringing yourself back to a more comfortable place.
Lots of love,
Chloe